
Written by
Jessica SheeWhy & How to Fix Mac Allow Accessories to Connect Missing
"I'm trying to connect a new USB A device to my M1 Mac Mini but the pop-up won't show up when I connect it to the Mac. I can't find the 'Allow accessories to connect' in Settings -> Privacy and Security either. Any idea why that happens and how to fix it? "
The Accessory Security, also known as Restricted Mode, is enabled by default and set to "Ask for New Accessories" in the "Allow accessories to connect" settings on your Mac. This configuration ensures that every time you connect a new external USB/Thunderbolt device or SD card (applicable to macOS 13.3 or later), your Mac prompts you for permission.
If you attempt to modify the accessory security settings and discover that the Mac allow accessories to connect not showing in the Settings, keep reading to find out why and what you can do.
Reasons for 'Allow Accessories to Connect' Missing on Mac
If the "Allow accessories to connect" option is invisible in the Privacy & Security settings, the main reasons include:
Your Mac has not been updated to macOS 13 Ventura or later
The Accessory Security feature was introduced with macOS Ventura in 2022. If your Mac is still running macOS 12 Monterey or an earlier version, it won't have this feature. This means it won't prompt you to approve external accessories when you connect them.
To check the macOS version on your Mac, go to the Apple menu > System Settings (or System Preferences) > General > About and find out what macOS version is installed on your Mac.
Your Mac is not a MacBook Air/Pro
If the "Allow accessories to connect" option is missing on macOS Ventura, that is because this feature is specifically designed for portable Mac computers, including MacBook Air and MacBook Pro.
If you're connecting external devices to an iMac, Mac mini, Mac Studio, or Mac Pro via USB or Thunderbolt ports, you won't receive prompts for approval, and the "Allow accessories to connect" menu will not be available on your Mac computer.
Your MacBook Air/Pro not using an Apple Silicon chip
According to Apple, "If you have a Mac laptop with Apple silicon, you have to approve new USB or Thunderbolt devices and SD cards that you connect to your Mac." This functionality is exclusive to MacBook Air/Pro powered by the latest Apple Silicon chips (M1, M2, and M3)
Therefore, the "Allow accessories to connect" option only appears on the following Apple silicon Mac laptops as of 2023:
- MacBook Pro (14-inch, 2023)
- MacBook Pro (16-inch, 2023)
- MacBook Air (M2, 2022)
- MacBook Pro (13-inch, M2, 2022)
- MacBook Pro (14-inch, 2021)
- MacBook Pro (16-inch, 2021)
- MacBook Air (M1, 2020)
- MacBook Pro (13-inch, M1, 2020)
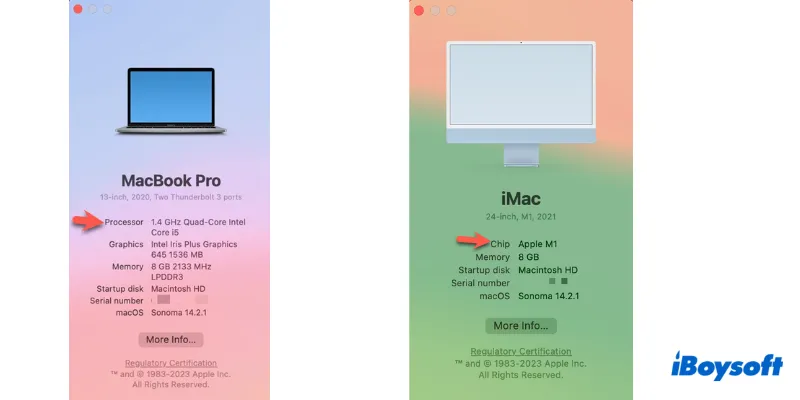
To find out if your Mac laptop uses Intel or Apple Silicon, go to the Apple menu in the menu bar > About This Mac. Mac computers with Intel processors will show an item labeled Processor, while Mac computers with Apple silicon will show an item labeled Chip.
If the information provided in this article has resolved your problem, please kindly share this page on your social media.
How to solve the 'Allow accessories to connect' settings not showing
This feature is exclusively associated with certain Mac models and macOS versions. If you are using a MacBook Air/Pro with Apple Silicon, the only solution to make the "Allow accessories to connect" option show up is to update your Mac to macOS 13 or later.
On the other hand, if you are not using a Mac laptop with Apple Silicon, this feature is not supported on your Mac desktops.
Bonus: How to protect your Mac by disabling USB/Thunderbolt ports
If you want to protect your Mac desktops against unknown wired peripherals, you can choose to disable USB ports on your Mac.
One highly recommended solution for this is iBoysoft DiskGeeker. With its USB Defender feature, you can password-protect any USB connection on your Mac. Moreover, you have the option to create a whitelist of trusted USB devices, eliminating the need to enter a password every time. This ensures that your Mac stays safeguarded from new or unfamiliar USB accessories, even when the system is unlocked.
How to protect your iMac/Mac mini/Mac Pro by restricting the USB access
Step 1. Free download, install, and launch iBoysoft DiskGeeker on your Mac.
Step 2. Click the three-dot icon in the upper right corner of the software and select USB Defender > Enable USB Defender.

Step 3. Set a password shorter than 48 digits to permit the connection of a USB device.
Step 4. Select a protection mode in the pop-up window.
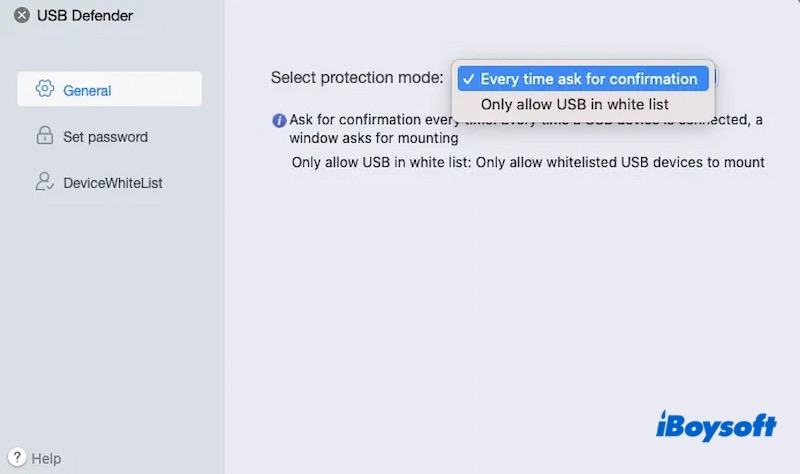
- Only allow USB in white list: Add the trusted USB device in a list and you will not be prompted to approve these devices with your password.
- Every time ask for confirmation: Block all USB ports on your Mac and prompt for the password each time a USB peripheral is plugged in.
Conclusion
If you're having trouble finding the "Allow accessories to connect" option in your Mac's Privacy & Security settings, make sure you have a Mac laptop equipped with an Apple silicon chip. If you do, simply upgrade your Mac to macOS Ventura or a newer version to resolve the issue of the missing "Allow accessories to connect" option.
To safeguard your Mac desktops by limiting the USB connection, download iBoysoft DiskGeeker for free.