
Written by
Jessica SheeHow to convert NTFS to APFS without data loss?
Summary: This article will tell you how to convert NTFS to APFS without losing data. More excitingly, you can use iBoysoft NTFS for Mac to read and write to your NTFS drive without any extra effort. It works just like the native APFS. Grab a free trial now.
"I use a Windows 10 machine for many years but my computer recently died. I am interested in changing over to a Mac machine to learn Photoshop and video editing skills. The main issue is getting my work documents and photos that I have worked on, which are on separate NTFS external hard drives. I believe I need to go from NTFS to APFS. I am not sure how to do it and keep all my files of the same quality at the same time. Anybody can help?"
--A user from Tom's hardware
When people want to move from the Windows platform to the Apple platform using an external drive formatted with the NTFS file system, they will always find that the files on the NTFS drive are non-editable and non-transferrable on Mac.
That's because macOS can't mount an NTFS drive on Mac with NTFS write support. That's to say, you can read NTFS drives on Mac but can't write to Microsoft NTFS-formatted drives on Mac.
Therefore, you must be considering converting NTFS to APFS to solve the inconvenience. This post will teach you how to convert NTFS to APFS without losing data so that you can use the external drive on Mac freely. But before converting NTFS to APFS, did you know what those two different file systems are? Did you know what advantages they have?
Knowing those might help you decide if you want to keep using the NTFS file system or move to the APFS file system.
Table of Contents:
- 1. NTFS vs. APFS
- 2. Convert NTFS to APFS with the help of an NTFS-HFS converter
- 3. Reformat NTFS to APFS in Disk Utility
- 4. How to write to NTFS drives on Mac without formatting?
- 5. Conclusion
NTFS vs. APFS
What is the NTFS file system?
NTFS (New Technology File System) replaced the FAT32 file system and became the default file system in Windows 10, Windows 8, Windows 7, Windows Vista, and Windows NT operating systems. NTFS also is supported in other operating systems such as Linux and BSD. macOS only has NTFS read support and its NTFS write support is disabled by default and experimental.
NTFS has a lot of advantages compared to its former default file system FAT32. For instance:
- It has higher security by controlling permissions to the files.
- NTFS is optimized to be able to encrypt, decrypt, compress and decompress files.
- NTFS deals with large files and partitions very successfully if you are using any external storage media larger than 32GB in Windows.
What is the APFS file system?
APFS (Apple File System) is Apple's newest file system coming with macOS High Sierra. macOS Ventura, macOS Monterey, macOS Big Sur, macOS Catalina, and macOS Mojave use APFS as the default file system as well. Windows doesn't have APFS support at all. You can't read nor write to APFS drives on Windows.
Compared with previous default file systems, HFS and HFS+, formatting external drives to APFS has a few advantages. For example:
- It is optimized for faster read-write speed on SSDs and flash-memory devices.
- It supports full-disk encryption and multiple copies of the same file.
- It allows users to manage the disk storage more efficiently by having flexible free space.
There is certainly a gap between Microsoft NTFS drives and Mac operating system. If you want to use this external HD interchangeably between Windows and macOS, it is better to format an external hard drive for Mac and PC with FAT or exFAT format.
On the other hand, if you are going to move to macOS permanently and use the external drive on a Mac running macOS Ventura/Monterey/Big Sur/Catalina/Mojave/High Sierra, it is a good idea to convert NTFS to APFS since APFS is the primary file system in them now.
Does converting to APFS delete data? Converting a file system formatted on a drive might delete data. Therefore, you need to handle the process with care and back up your NTFS drive, or it might cause data loss. Check the section below to know how to convert NTFS to APFS without losing data.
Convert NTFS to APFS with the help of an NTFS-HFS converter
There is no software in the market that can convert NTFS directly to APFS yet, but there is software to convert NTFS to HFS+. So you have to make a detour - convert NTFS to HFS+ first and then convert HFS+ into APFS on Mac.
Step 1: Convert NTFS to HFS+ with a free Paragon NTFS-HFS Converter.
At this step, we need to seek help from Paragon NTFS-HFS Converter, a free tool that can easily convert NTFS drive to HFS+ and vice versa. It offers us an option to back up files on the NTFS drive to avoid data loss.
Just download and install Paragon NTFS-HFS Converter and simply convert the NTFS drive to HFS+ according to its guidance.
Warning: Be sure to utilize the software's backup option for data security. Do not proceed without a backup of your important files on the NTFS drive.
Step 2: Convert HFS+ to APFS in Disk Utility on Mac.
Disk Utility is a built-in utility on Mac for users to perform disk-related activities, such as:
- Repair minor file system errors
- Create new partitions on a disk
- Reformat a disk
- Mount and unmount drives or partitions
Here is the guide to converting HFS+ into APFS:
1. Go to Finder > Applications > Utilities > Disk Utility.
2. Right-click the NTFS drive (now it should be formatted with HFS+).
3. Choose "Convert to APFS...".
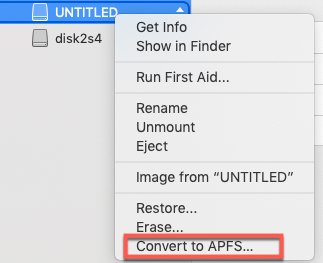
4. Wait for the conversion process to complete.
This method is so easy that you can finish conversion even without any previous experience.
Mac users may be unable to Convert to APFS, so it's important to know why the Convert to APFS option is greyed out or not available in Disk Utility, and how to fix the problem.
Reformat NTFS to APFS in Disk Utility
Another option that you can use APFS-formatted drives on Mac is to reformat NTFS into APFS.
Here are the steps about how to reformat NTFS into APFS without data loss:
Step 1: Back up files.
Technically speaking, formatting or reformatting a drive will write a new directory structure to this disk. After reformatting, the disk will appear blank and you have no access to your files. Therefore, you will need to back up your files before you perform reformatting the NTFS drive.
1. Connect the NTFS drive to the Mac.
2. Copy and paste the important data from the NTFS drive to the Mac. If your Mac doesn't have enough capacity for data backup, use another external drive formatted with a Mac-friendly format for backup.
If you have tons of data on the NTFS drive, it might take a while. But it's worth waiting if you don't want to lose your important data.
Step 2: Reformat NTFS to APFS in Disk Utility on Mac.
The process is very easy to follow.
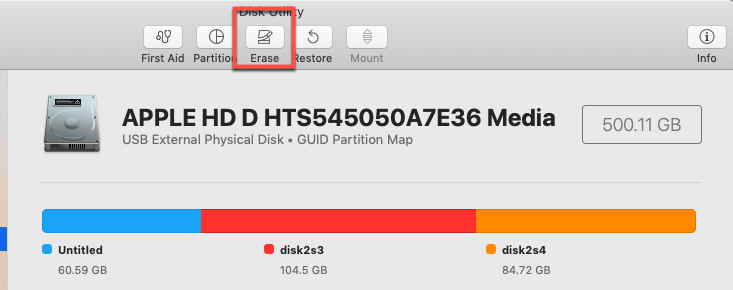
1. Go to Finder > Applications > Utilities > Disk Utility.
2. Connect the NTFS drive to the Mac.
3. Click the NTFS drive.
4. Click "Erase" on the toolbar.
5. Input a name for your drive.
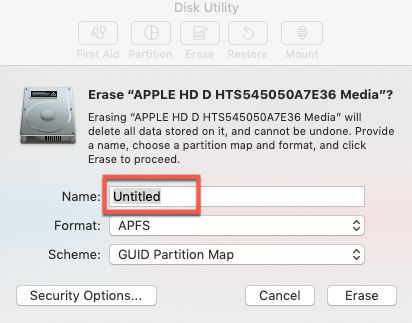
6. Choose "APFS" as the format and choose "GUID Partition Map" as the Scheme.
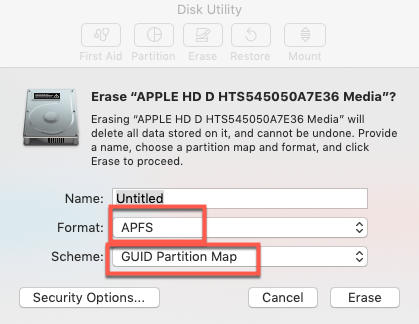
7. Click on the "Erase" button.
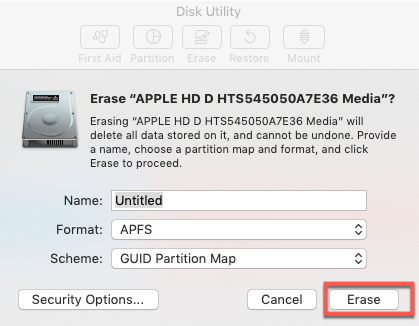
When the reformatting process completes, you will have an APFS-formatted drive.
Both methods introduced above can help you move from NTFS to APFS and then you won't have any problem reading and writing the external drive on Mac running macOS Ventura/Monterey/Big Sur/Catalina/Mojave/High Sierra.
How to write to NTFS drives on Mac without formatting?
Besides changing NTFS into APFS, using a third-party NTFS for Mac driver can also help you solve Mac external hard drive read-only issue without converting. You don't need to spend much time waiting for backing up and reformatting the drive. You can keep enjoying the advantages of the NTFS format and mount NTFS drives in read-write mode on Mac as well.
iBoysoft NTFS for Mac is a handy tool for Mac users to enable full read-write access to NTFS drives on Mac. It can mount Microsoft NTFS-formatted drives in read-write mode automatically on Mac, including Apple M1, M1 Pro, and M1 Max Mac. It has a fast NTFS write and file transferring speed.
Here is the tutorial on how to use iBoysoft NTFS for Mac to enable NTFS writing ability on Mac:
Step 1: Free download and install iBoysoft NTFS for Mac on Mac.
Step 2: Connect your NTFS drive to your Mac computer.
Step 3: After your drive is mounted successfully, you can manage your drives and read-write to NTFS drives.

Note: A pop-up will ask you to install an NTFS driver by iBoysoft and enable System Extensions when you fail to read and write to the NTFS disk.
Besides its NTFS write support, iBoysoft NTFS for Mac is also a comprehensive NTFS drive management tool for users to better manage NTFS drives and external drives. It can open, unmount, eject, and erase NTFS disks.
Even when there are NTFS file system errors, the software can try to repair the errors. Additionally, it can list and open all connected USB flash drives, SD cards, memory sticks, and external hard drives with one click. Moreover, it can reformat other file systems to NTFS if needed.
Conclusion
The incompatibility makes it inconvenient to transfer files from NTFS drives to Mac computers. Formatting NTFS into APFS can solve the NTFS drives read-only problem on Mac. More importantly, do not forget to do data backup before changing NTFS to APFS to avoid data loss.
If you want to keep your drive formatted with NTFS and use it on Mac, iBoysoft NTFS for Mac is the NTFS for Mac software that can help you achieve your goals more easily.
A
1. Open Finder > Applications > Utilities > Disk Utility .
2. Right-click the volume you want to convert to APFS.
3. Choose the Convert to APFS option in the menu.
A
You can convert an external hard drive to APFS by simply right-clicking the partition and choosing Convert to APFS in the menu.
A
Yes, you can transfer files on your NTFS drives to Mac because macOS supports reading the Windows NTFS file system. You can copy and paste NTFS files to Mac.