
Written by
Vain Rowe
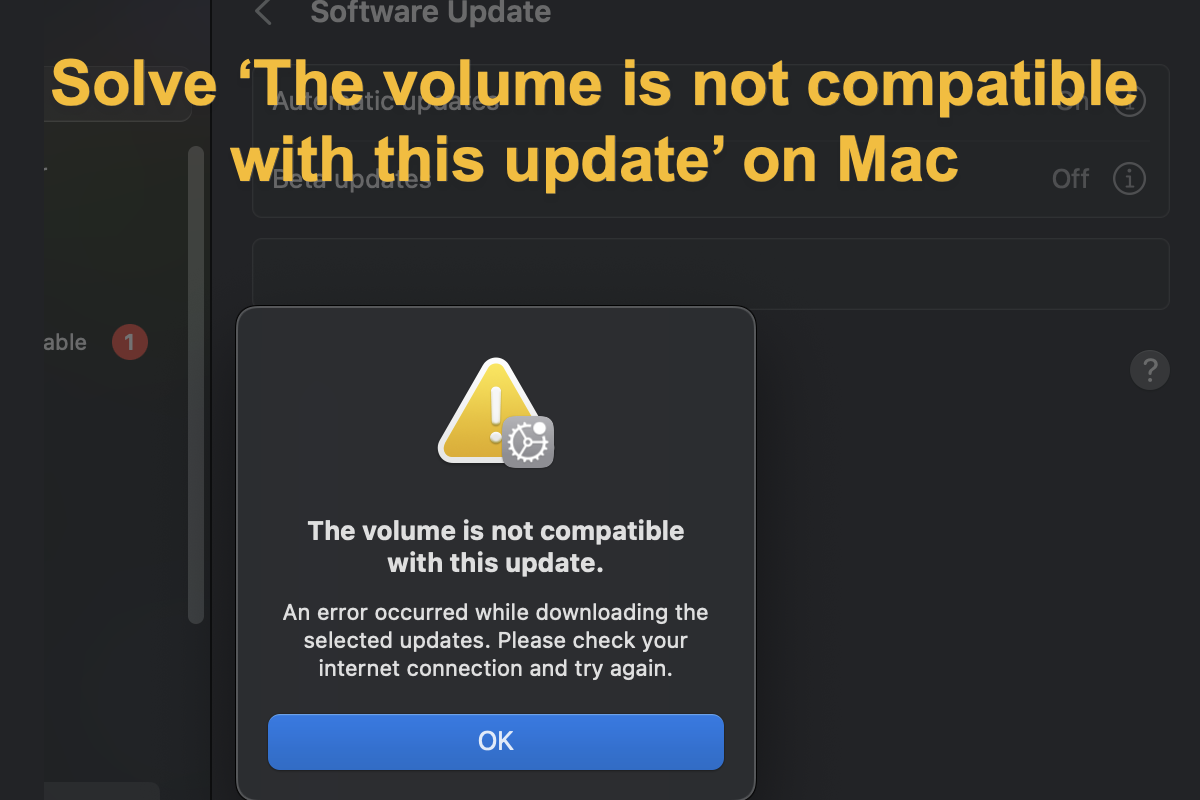
Troubleshoot 'The volume is not compatible with this update' on Mac
Summary: This post aims to solve the popup 'The volume is not compatible with this update' on Mac in the middle of the macOS update installation. Moreover, iBoysoft Data Recovery Software helps a lot in restoring valuable data when you suffer from data loss during the troubleshooting process.
I want to install Big Sur on an external drive to boot from it. I formatted the drive with the GUID partition map scheme but when I try to install Big Sur, I select the drive and it says the volume is not compatible with this upgrade. The external drive is a LaCie Rugged 500GB Thunderbolt USB-C.
Does this trouble seem familiar? If it does, you've come to the right place. Some users certainly plan to install macOS on an external hard drive and make it a bootable installer, yet they are stuck in a notification saying "The volume is not compatible with this update" in the middle. More often, this trouble happens on macOS Sonoma and macOS Big Sur, making users confused and frustrated.
Take it easy, this post is gonna get the "The volume is not compatible with this update" notification fixed for you to install macOS on an external drive successfully. All you need to do is follow this article with patience.
Why does the 'The volume is not compatible with this update' happen on Mac?
Before going deep into the final solution, let's figure out why the "The volume is not compatible with this update" message pops up first. According to our verified study, we find that this error occurs due to the file system or system files of the targeted disk you select being too old, resulting in the incompatible notification.
The cause makes the solution clear here. All you need to do is format the external hard drive and give it the latest file system to proceed with the macOS update install.
If you find this article informative, kindly share it with more people on your social platform!
How to fix 'The volume is not compatible with this update' on Mac?
We've made the final culprit clear in the last section already, which brings out the final solution -- format the external hard drive to the newest file system compatible with macOS.
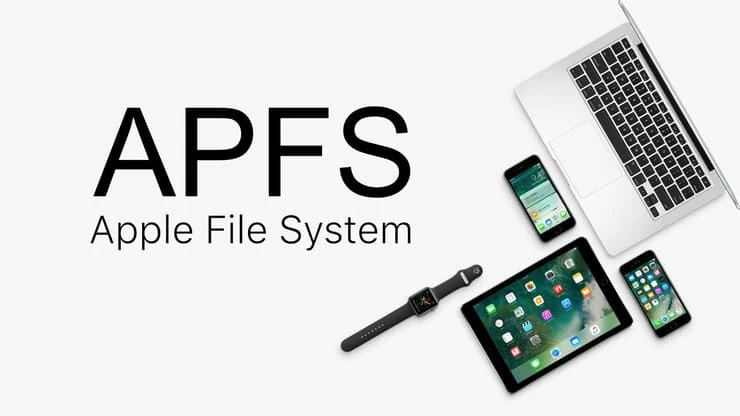
Apple has developed 3 file systems along with its sorts of macOS versions, while APFS is the most widely used one. Once you encounter a "The volume is not compatible with this update" message when installing macOS to an external HDD/SSD, you can directly format the destination drive on Mac.
Note that the drive formatting will wipe everything completely, so please back up important files before the formatting job. You can copy and paste the data on another drive via a computer or store them in cloud storage. No matter which way you apply, the backup is crucial.
After the backup, let's see how to format the drive for the macOS install:
Step 1: Connect the desired drive to your Mac computer via an available adapter or connector.
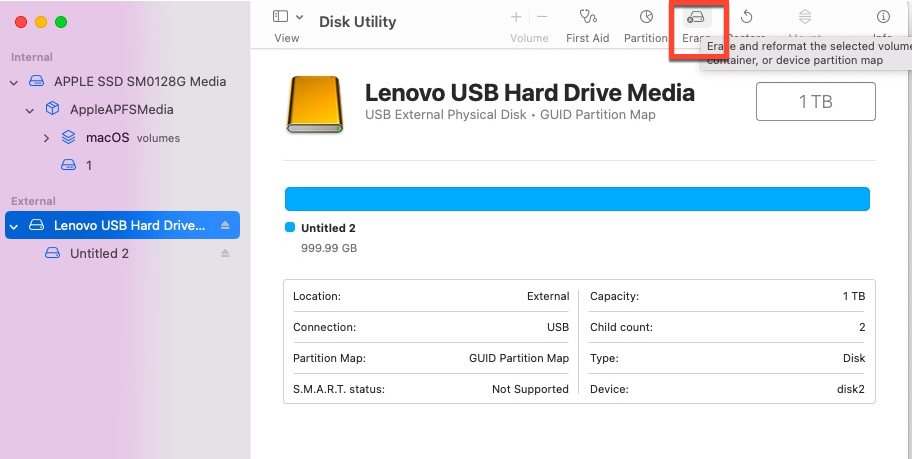
Step 2: Once the drive mounts, open Disk Utility and click the View button to select Show All Devices.
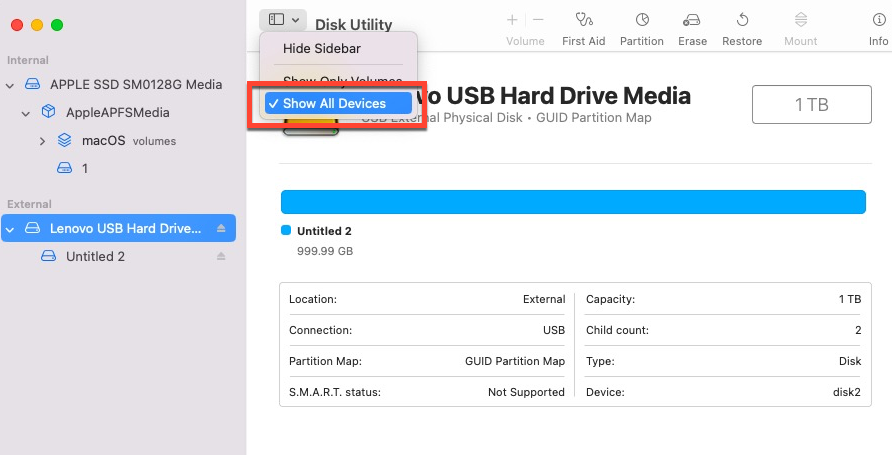
Step 3: Select your external hard drive on the left sidebar of Disk Utility and click Erase on the top menu bar.
Step 4: When a new window pops up, give the hard drive a new name as you like.
Step 5: Choose APFS in the Format box and GUID Partition Map in the Scheme box.
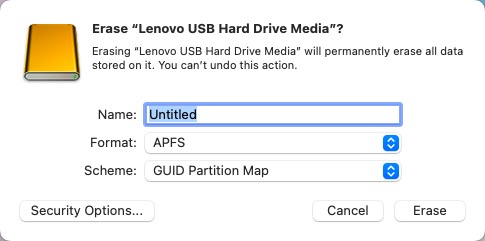
Step 6: Click Erase to confirm your actions.
When the drive formatting ends, continue the macOS install job and see if the "The volume is not compatible with this update" notification comes again.
If you find this way helpful in fixing the notification saying "The volume is not compatible with this update" on Mac, please share this post to help more people!
What to do if data loss happens during or after the drive formatting?
If you forget to back up the drive or the backup gets lost unexpectedly, we're glad to facilitate you here. Generally, at the moment you suffer from data loss, you should perform data recovery as quickly as possible since the later the time goes, the lower the data recovery success rate is.
We recommend the top data recovery helper -- iBoysoft Data Recovery Software here, which is outfitted with outstanding disk scanning skills and excellent data recovery algorithms. It can recover deleted, missing, or lost files from formatted, unreadable, unbootable, corrupted, broken, and even failing internal/external hard drives with a high success rate.
Regardless of you forgetting to backup before the drive formatting or losing the backup files, iBoysoft Data Recovery Software scans the drive bit by bit and sector by sector for any traces of lost files.
Let's see how to utilize iBoysoft Data Recovery Software to scan for the lost files on your Mac:
Step 1: Connect the external hard drive to your Mac computer with an adapter. (Skip this step if data loss happens on the Mac's internal hard drive.)
Step 2: Free download and install iBoysoft Data Recovery Software on your Mac. Do not place it on the drive where data loss happens.
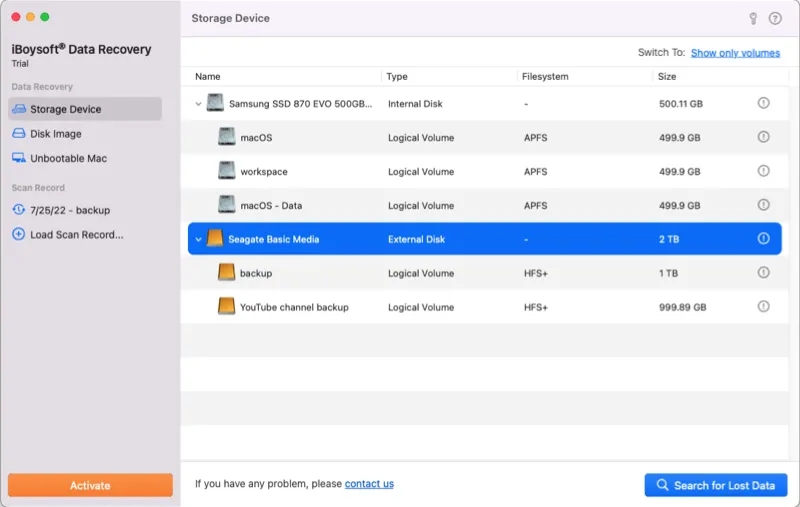
Step 3: Launch iBoysoft Data Recovery Software and select your hard drive in the device list.
Step 3: Click Search for Lost Data to initialize the disk scanning process.
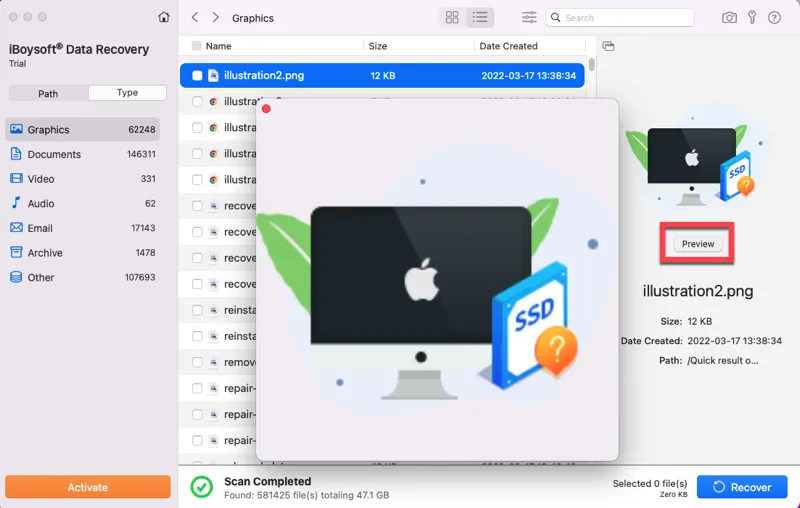
Step 4: When the disk scanning process ends, you can right-click the scanned result and click Preview to check it beforehand.
Step 5: Check the files you want and click Recover to begin the file recovery process. When the data recovery process finishes, save the recovered files well to avoid further data loss.
If you have recovered lost files successfully, why not share this wonderful toolkit with more people on your favorite platform?
Tips you should know to install macOS on an external hard drive
Although installing macOS on an external SSD or HDD is not as complicated as quantum mechanics, there are some tips you can still bear in mind, which make the installation process less barriers.
1. Check the available space of the targeted drive to see if it's enough to hold a macOS. If not, the installation process will fail. Besides, the available space better be bigger than the desired macOS for the OS to run smoothly.
2. Make a full backup of the data stored on the targeted drive or any unexpected accident may result in data loss. You can either back up the files to the second drive or store them on cloud storage directly.
3. Please do complete the macOS download from a reliable and trustworthy way, including Apple's official site or App Store, given that a third-party path might provide you with a shaky OS or plant your device with malware, trojan, or bloatware.
Final words
This post sheds light on how to fix the "The volume is not compatible with this update" on your Mac, moreover, it provides an effective way to deal with the data loss that happens during or post the macOS installation on the external hard drive.
Finally, some useful tips to make the macOS install on the external drive smoother are also included. If you're interested in any of them, do not hesitate and have a full reading right now!