
Written by
Amanda Wong
Upgrade MacBook Air/Pro/iMac HDD/SSD Without Losing Data
Summary: This post guides you to upgrade the HDD or SSD on your MacBook Air/Pro/iMac without losing data, you can clone the Mac drive to the new drive with iBoysoft DiskGeeker. Even if it is a Mac with an irreplaceable drive, you can upgrade it by booting the Mac from an external SSD.
Perhaps, your Mac is close to running out of disk space, or the current Mac drive is aged and delivers unsatisfactory performance, then you may consider upgrading the Mac drive to a new SSD.
Whether the Mac's internal drive is an HDD or SSD, you can upgrade it for a larger capacity, and better performance. This post guides you to upgrade the Mac drive without losing data.
Whether you need to upgrade your Mac HDD/SSD
Before proceeding, you should confirm whether a Mac hard drive upgrade is necessary. If you only use your Mac for simple tasks, such as surfing the web and editing text, then a traditional HDD will suffice. If you want to speed up the Mac, you can make it by freeing up Macintosh HD.
However, suppose the current Mac HDD/SSD is worn out. In that case, the capacity is too small for your routine work, the Mac starts up very slow, performs sluggishly for CPU-intensive tasks, and has frequent system crashes, Disk Utility can't repair the disk, etc., then, it is time to upgrade the Mac with a new SSD.
Can you upgrade the internal HDD/SSD on your Mac
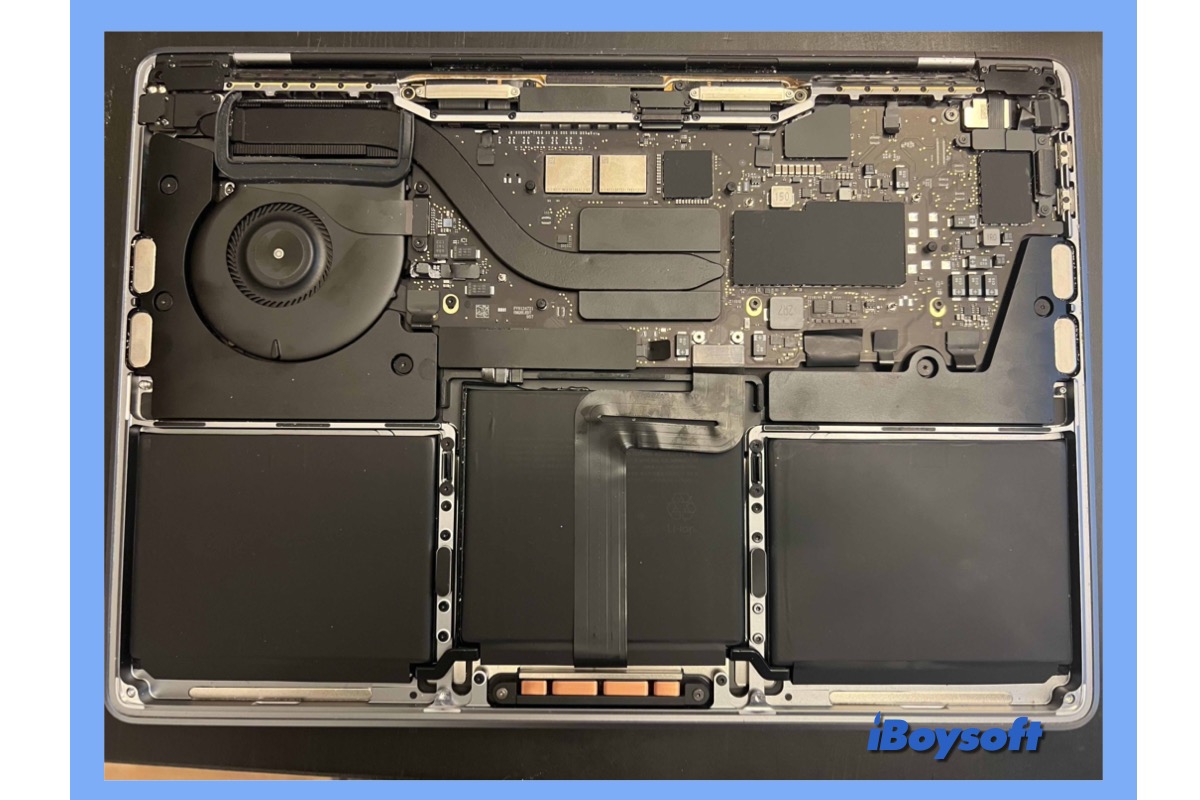
For an older Mac model, the internal HDD is replaceable, it allows you to disassemble the Mac, remove the old hard drive, and plug in the new one. However, for modern Mac computers from 2016 and later, the SSD is soldered to the motherboard when shipped out, making the Mac hard driver replacement practically impossible.
To replace the whole motherboard on a Mac with a built-in SSD is expensive, and there is a workaround, you can use the new SSD to create a bootable installer, and then you can boot the Mac from the external SSD.
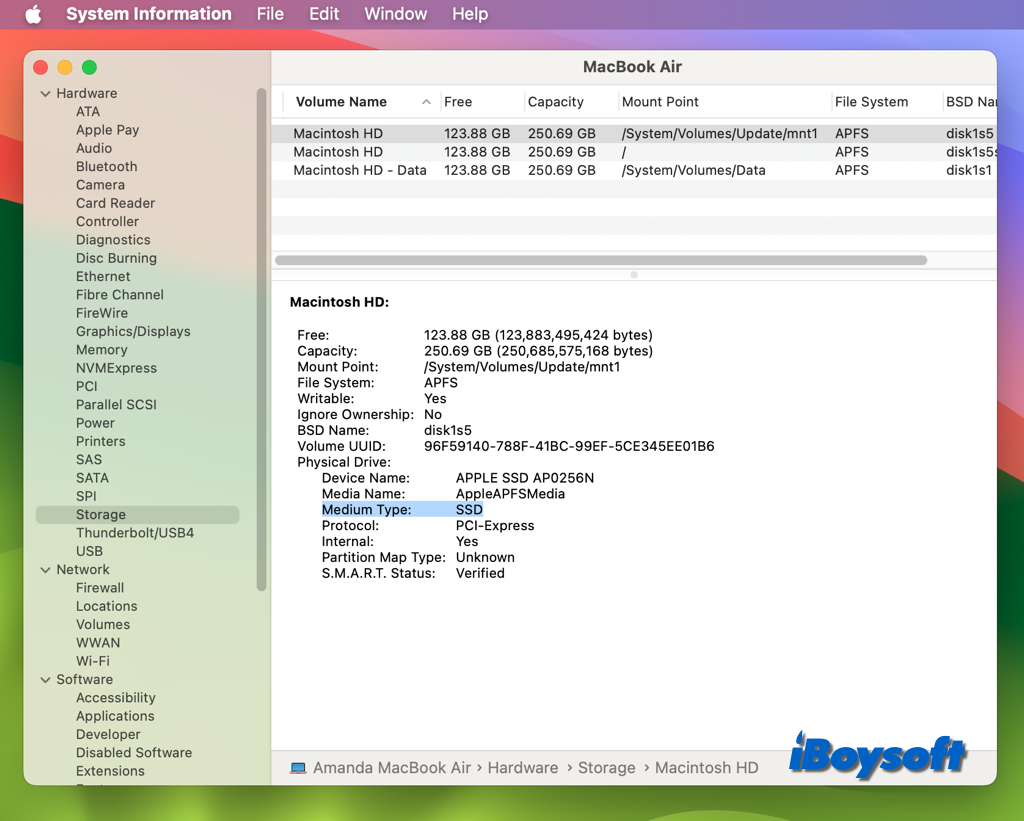
Here's how to check the Click the Apple logo and choose About This Mac.
- Click the Apple logo and choose About This Mac.
- Tap More Info on the right panel.
- Move to the bottom and choose System Report.
- On the pop-up dialogue, locate storage under Hardware.
- Check the medium-type info of the Mac physical drive.
Share this informative post with more people!
How to upgrade a Mac hard drive without losing data
Whether the internal drive on your Mac is replaceable or not, you can find a way in this part to upgrade it to HDD/SSD. First of all, you need to back up the Mac hard drive so that you can upgrade the Mac drive without losing data.
Among the multiple methods, cloning a Mac hard drive to the new disk is more straightforward, it is time-saving compared with Time Machine. iBoysoft DiskGeeker, an all-in-one disk management tool for Mac. It helps to create a 1-to-1 copy of your startup disk or external drive to a target disk fast and stably. Just follow the steps below:
Steps to clone Mac hard drive to external disk:
- Free download, install, and open iBoysoft DiskGeeker on your Mac.
- Connect the new HDD/SSD to Mac as the target disk for cloning.
- Under the local drive section, select the top-level disk like APPlE SSD.
- Click the Clone icon on the right-side toolbar.
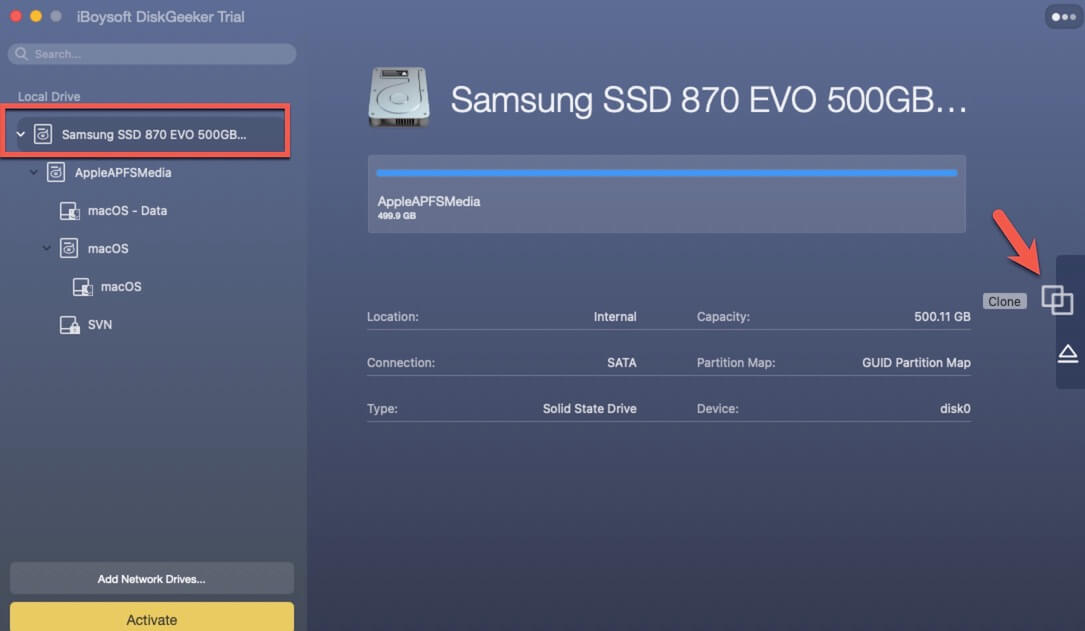
- Select the connected new drive as the destination device on the prompt.
- Tap the Start Cloning button and follow the on-screen to complete the process.
If you have already cloned the Mac hard drive, now you can proceed to upgrade it without losing data.
Case 1. The Mac internal drive is replaceable
Although most modern Macs are shipped with soldered SSDs which can't be replaceable, you may have an old Mac model that is equipped with a traditional hard drive, then you can upgrade it. Consider your options carefully, or hire an expert, as installing a third-party SSD into your Mac may void your warranty.
What you need to prepare is a SATA-to-USB cable or dock, a small screwdriver, and a Torx head screwdriver. Then, you can proceed with the Mac hard drive replacement:
- Turn off your Mac, use a small screwdriver to unscrew the screws, and remove the cover.
- Unscrew the two black screws from the plastic bracket holding the hard drive. Then, remove the bracket and hard drive.
- Rotate the connector to disconnect the SATA ribbon attached to one end.
- Use the prepared Torx head screwdriver to remove the four Torx screws from the hard drive.
- Replace the four Torx screws you removed from the old drive, then gently attach the SATA ribbon to your prepared SSD.
- Place the SSD in the same position as the old hard drive, install the bracket, install the back cover, and tighten ten small screws.
- Restart the Mac with the newly installed HDD/SSD and restore the data from the cloning.
Case 2. The Mac internal drive is irreplaceable
Due to the device's design, Macs manufactured in 2017 or later might be unable to be updated. But you can make it by connecting it to an external bootable disk. That is to say, you can boot the Mac from an external drive, it could extend the Mac's limited internal disk space and boost the Mac's performance.
Now, it's time to restore the Mac with the replaced drive from a clone:
- Shut down the Mac, connect the external drive containing the clone, and boot the Mac into macOS recovery mode.
- Open Disk Utility and select Mac startup disk on the left list, then click the Restore button.
- On the new dialogue, select the external drive that saves the clone next to Restore From, and choose the Mac hard drive next to Restore to.
- Tap the Restore button to start the process, when it finishes, restart your Mac.
These steps are helpful to replace the Mac hard drive? Just click the button below to share!